Every now and then we get requirements to create auto-suppression lists. Most common examples are hard-bounce auto suppression, spam-complaint auto suppression etc.
The general process to update an auto suppression list is to create an automation with 4 activities –
Activity 1: Query Activity to populate the staging data extension
Activity 2: Data Extract Activity to extract the data
Activity 3: File Transfer Activity to transfer the file to SFTP
Activity 4: Import into the auto – suppression list
However, we can replace all 4 activities with just 1 query activity. Benefits –
1. You don’t have to configure 4 activities in order to update the auto – suppression list.
2. Saves the configuration time and runs efficiently.
3. You can deploy it using package manager to other business units.
How do we do it?
Follow below steps –
Step 1 – Create an auto suppression list

Step 2 – Create a sample data extension (Don’t put too much effort because this DE will be replaced with the auto-suppression list by Step 4 – script)
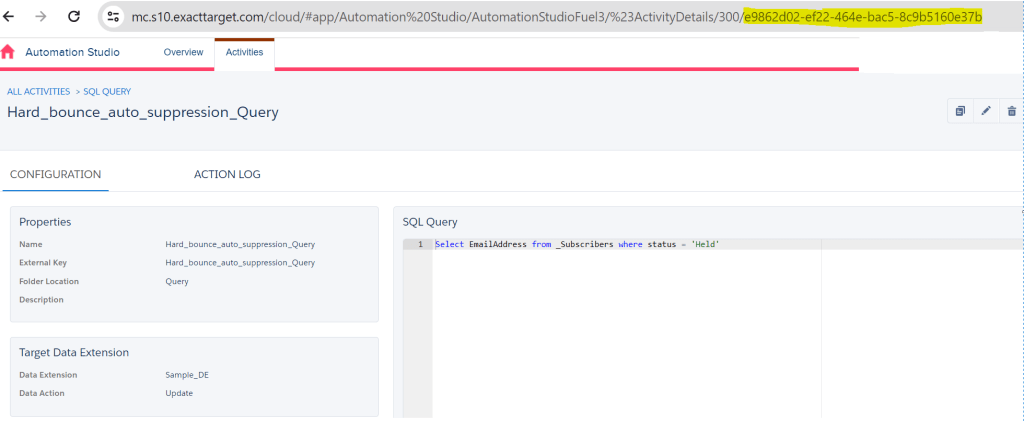
Step 3 – Create an SQL query to update the DE created in step 2. And make a note of object ID. You can find the query object ID in the URL (36-alphanumeric characters). See example –
Step 4 – Run below SSJS script on a cloud page (this will replace the target audience of the step 3 -query to the auto suppression list created in step 1 — Update the query syntax, customerkey, objectID, Target customerkey and Name with your query/auto-suppression list/DE details)
<script language="javascript" runat="server">
Platform.Load('Core', '1');
var prox = new Script.Util.WSProxy();
var queryStr = '';
    queryStr += 'SELECT DISTINCT';
    queryStr += '\ns.Emailaddress AS [Email Address]';
    queryStr += '\nFROM ENT._Bounce b';
    queryStr += '\nINNER JOIN ENT._Subscribers AS s';
    queryStr += '\nON b.SubscriberKey = s.SubscriberKey';
    queryStr += '\nWHERE b.BounceCategoryID = 1';

  var queryDef = {
    CustomerKey: 'Hard_bounce_auto_suppression_Query',
    ObjectID: 'e9862d02-ef22-464e-bac5-8c9b5160e37b',
    QueryText: queryStr,
    TargetType: 'DE',
    TargetUpdateType: 'Update',
    DataExtensionTarget: {
      CustomerKey: 'Hard_bounce_auto_suppression',
      Name: 'Hard_bounce_auto_suppression'
    }
  };
var updateQuery = prox.updateItem('QueryDefinition', queryDef);
Write('result: ' + Stringify(updateQuery))
</script>
Expected result of the above script –
result: {"Status":"OK","RequestID":"efa1aa68-c6b1-4487-9bae-2d20dd24206c","Results":[{"Object":{"QueryText":"SELECT DISTINCT\ns.Emailaddress AS [Email Address]\nFROM _Bounce b\nINNER JOIN _Subscribers AS s\nON b.SubscriberKey = s.SubscriberKey\nWHERE b.BounceCategoryID = 1","TargetType":"DE","DataExtensionTarget":{"Name":"Hard_bounce_auto_suppression","Description":null,"Keyword":null,"Client":null,"PartnerKey":null,"PartnerProperties":null,"CreatedDate":"0001-01-01T00:00:00.000","ModifiedDate":null,"ID":0,"ObjectID":null,"CustomerKey":"Hard_bounce_auto_suppression","Owner":null,"CorrelationID":null,"ObjectState":null,"IsPlatformObject":false},"TargetUpdateType":"Update","FileSpec":null,"FileType":null,"Status":null,"CategoryID":0,"InteractionObjectID":null,"Name":null,"Description":null,"Keyword":null,"Client":null,"PartnerKey":null,"PartnerProperties":null,"CreatedDate":"0001-01-01T00:00:00.000","ModifiedDate":null,"ID":0,"ObjectID":"e9862d02-ef22-464e-bac5-8c9b5160e37b","CustomerKey":"Hard_bounce_auto_suppression_Query","Owner":null,"CorrelationID":null,"ObjectState":null,"IsPlatformObject":false},"UpdateResults":null,"ParentPropertyName":null,"StatusCode":"OK","StatusMessage":"QueryDefinition updated","OrdinalID":0,"ErrorCode":0,"RequestID":null,"ConversationID":null,"OverallStatusCode":null,"RequestType":"Synchronous","ResultType":null,"ResultDetailXML":null}]}Step 5 – After successful run of the script. Check the query that you created in Step 3 under automation studio – you will observe that the target data extension has now changed to the auto-suppression list name that was created in Step 1.

Now, you can use this query to update the data in an auto – suppression list directly from an automation.

Leave a reply to Mradul Srivastava Cancel reply